Impacted Wisdom Tooth: How to Prevent Complications (3/5)

Table of Contents

Introduction

this article discusses various techniques and assessments used in the removal of impacted mandibular third molars. Winter’s Lines (WAR) are imaginary lines used to assess the position and depth of impacted teeth, while Frank’s technique helps localize the mandibular canal to prevent nerve damage. The WHARFE assessment considers factors like root shape and follicle development to predict surgical difficulty. Different flap designs, such as L-shaped, triangular, envelope, and bayonet flaps, are used in surgical procedures to ensure proper access and visibility during extraction. These techniques aim to minimize complications and ensure successful outcomes in impacted tooth surgeries.

Difficulty Indice for Removal of Impacted Mandibular Third Molar

Winter’s lines/ WAR lines​

WAR Lines in Impacted Mandibular Third Molar.

The Winter’s Lines (WAR) are a set of three imaginary lines used to assess the position and depth of impacted mandibular third molars on dental X-rays. These lines aid in determining the difficulty of removing the impacted tooth. The three lines are as follows:
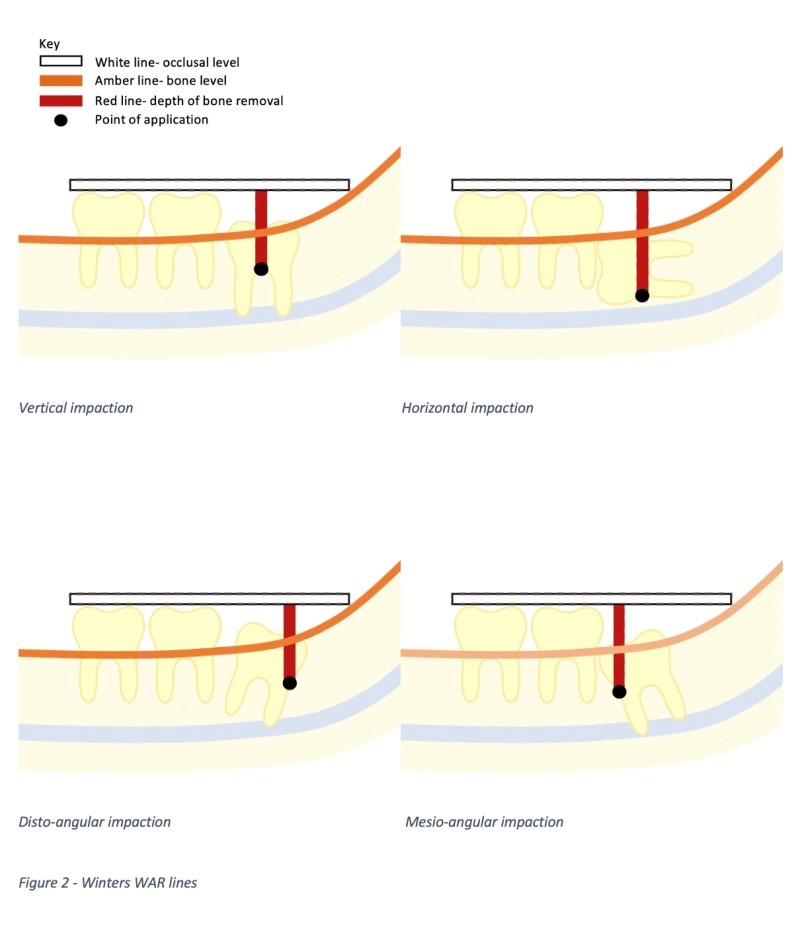
  1. White Line: This line is drawn along the occlusal surfaces of the erupted mandibular molars and extended over the third molar posteriorly. It indicates the difference in occlusal level between the first and second molars and the third molar.
  2. Amber Line: The amber line represents the height of the bone level. It is drawn from the surface of the bone on the distal aspect of the third molar or from the ascending ramus to the crest of the inter-dental septum between the first and second molars. This line provides an indication of how much bone will need to be removed for extraction.
  3. Red Line: The red line is an imaginary line drawn perpendicular from the amber line to a point where an elevator would be applied during extraction. Typically, this point is at the cemento-enamel junction on the mesial aspect of the impacted tooth. The red line signifies the depth of the tooth in the jaw and indicates how much bone must be removed before elevation.
  • The length of the red line is crucial in determining extraction difficulty. According to Howe, for every 1mm increase in length, the tooth becomes three times more difficult to remove. If this measurement is less than 5mm, local anesthesia may suffice for extraction; however, if it exceeds 5mm, general anesthesia or sedation may be more appropriate.
impaction

Frank’s Technique of Localizing Mandibular Canal in Impacted Tooth​

  1. V H Frank presented a technique for localizing the mandibular canal in impacted teeth. This method is crucial in oral surgery to prevent damage to the inferior alveolar nerve, which runs through the mandibular canal.
  2. By accurately identifying the position of the mandibular canal, surgeons can perform procedures such as tooth extraction or implant placement with reduced risk of nerve injury.
  3. The technique involves utilizing radiographic imaging, specifically radiographs of the mandible.
  4. Through careful analysis of these images, including panoramic radiographs and periapical views, the surgeon can determine the precise location of the mandibular canal in relation to the impacted tooth.
  5. This information guides the surgical approach and helps avoid complications during the procedure.
  6. In cases of impacted teeth where proximity to the mandibular canal poses a risk, such as lower third molars (wisdom teeth), employing Frank’s technique is essential for safe and successful surgical outcomes.
  7. By understanding the anatomical relationship between the tooth and the mandibular canal, surgeons can plan their interventions effectively and minimize potential nerve damage.

WHARFE’s Assessment of Impacted Tooth​

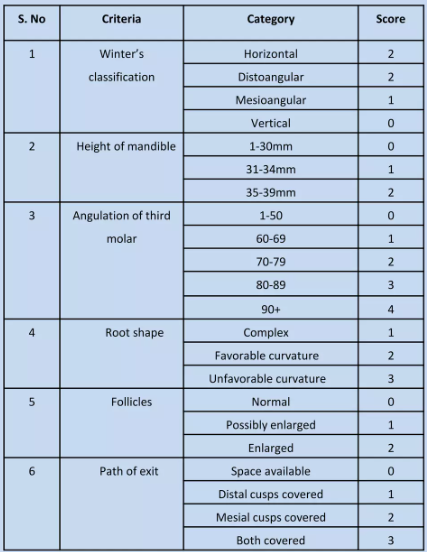
  • The WHARFE assessment is a method used to evaluate the difficulty of impacted tooth surgery, specifically focusing on impacted mandibular third molars.
  • This assessment involves six key factors that are considered when determining the complexity of the surgical procedure:
  1. Winters Classification: This factor looks at the classification of the impaction based on Winter’s lines, which help determine the position and depth of the mandibular third molar.
  2. Height of the Mandible: The height of the mandible is taken into account as it can influence the accessibility and surgical approach required for impacted tooth removal.
  3. Angulation of the 2nd Molar: The angulation of the adjacent second molar plays a role in assessing the difficulty of removing an impacted third molar.
  4. Root Shape & Morphology: The shape and morphology of the roots of the impacted tooth are considered as they can affect the ease or difficulty of extraction.
  5. Follicle Development: The development and size of the follicle surrounding the impacted tooth are evaluated as they can impact the surgical procedure.
  6. Path of Exit of the Tooth During Removal: Understanding how the impacted tooth will need to be maneuvered during extraction is crucial in determining surgical difficulty.

    The WHARFE assessment provides a structured way to predict potential challenges during surgery by considering these factors collectively. It helps oral and maxillofacial surgeons anticipate problems and plan accordingly for a smoother extraction process
Pederson’s Scale​

Pederson’s Scale​
Pederson index is used to predict the difficulty of cases of impacted mandibular third molar extractions.

Surgical Procedure in Removal of Impacted Mandibular Third Molar

The surgical procedure for the removal of an impacted mandibular third molar, commonly known as a wisdom tooth, involves several steps to ensure a successful outcome. The process typically includes the following key stages:

  • Preoperative Assessment:
    • Before the surgery, a thorough assessment of the patient’s medical history, clinical examination, and radiographic evaluation is conducted to determine the position of the impacted tooth, its proximity to vital structures like nerves or sinuses, and any potential complications.
  • Anesthesia:
    • Local anesthesia is administered to numb the area around the tooth to be extracted. In some cases, sedation or general anesthesia may be used based on the complexity of the procedure and patient preference.
  • Soft Tissue Management: Incision and Flap design
    • The oral surgeon makes an incision in the gum tissue to access the impacted tooth. If necessary, a flap may be raised to expose the tooth and surrounding bone adequately.
    • To preserve an adequate blood supply, the base of the flap must be broader than the free margin.
    • Incisions must always be made over the intact bone.
    • It should be a full thickness mucoperiosteal flap.
    • The flap should be designed in such a way to avoid injury to the vital structures present.

Flaps can be of different types:

a) L-shaped flap​

  • The L-shaped incision is a type of flap used in third molar extraction surgeries.
  • It falls under the category of the Modified Partial Newmann flap, which is one of the three most commonly used flaps for third molar surgery.
  • This flap design involves creating an L-shaped incision that extends from the distal aspect of the second molar to the retromolar area, allowing for better access and visibility during the surgical procedure.
  • The vertical component of the incision runs along the distal aspect of the second molar, while the horizontal component extends posteriorly towards the retromolar area.
  • In surgical procedures, an L-shaped incision flap is typically created by making two incisions that intersect at a right angle, resembling the shape of the letter “L.”
  • The steps involved in creating an L-shaped incision flap are as follows:
  1. Marking the Incision: The surgeon begins by carefully marking the outline of the incision on the skin, ensuring precision and accuracy in creating the flap.
  2. Making the Long Limb of the Incision: The first incision is made along one side of the intended flap, following the marked line. This initial incision determines the length of one side of the “L” shape.
  3. Creating the Short Limb: At a point perpendicular to the end of the first incision, a second incision is made to create the shorter limb of the “L” shape. This second incision intersects with the first one at a right angle.
  4. Elevating the Flap: Once both limbs of the L-shaped incision are made, the surgeon carefully elevates and retracts the flap to expose the underlying tissues or structures that need to be accessed during the procedure.
  5. Performing Surgery: With the flap elevated, the surgeon can then proceed with performing the necessary surgical intervention while maintaining visibility and access to the area.
  6. Closing the Incision: After completing the surgery, the flap is repositioned back into place, and both limbs of the incision are closed using appropriate suturing techniques to promote proper healing and minimize scarring.
  • This type of flap design aims to minimize complications associated with the extraction, such as damage to adjacent structures like nerves, bone, and soft tissues, as well as reducing postoperative issues like pain, inflammation, trismus, infection, or paresthesia.
  • The L-shaped incision flap is commonly indicated in oral surgical procedures where access and visibility are crucial. This type of flap design is particularly useful in surgeries involving multiple adjacent teeth or when there is a need for extensive visualization of the surgical area. The L-shaped incision allows for a wide base that ensures vascularity and adequate blood supply to the flap, promoting healing and reducing the risk of complications such as necrosis or dehiscence. Additionally, the L-shaped flap design helps in maintaining tissue integrity and minimizing trauma to surrounding structures, leading to better post-operative outcomes.
impaction

b) Triangular flap​

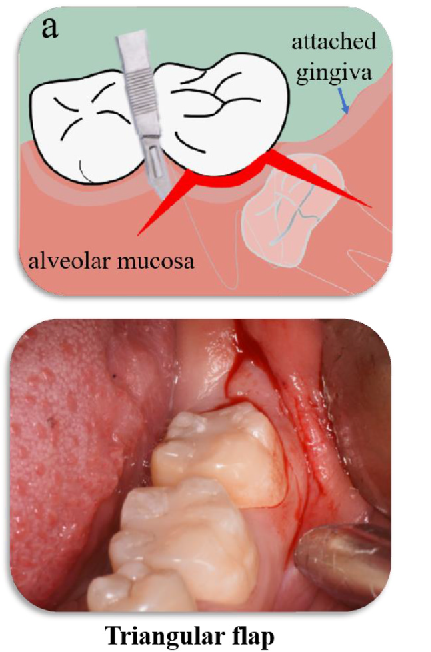
  1. The distal-triangular flap and lingual-based triangular flap are two different flap designs used in impacted mandibular third molar extraction surgeries.
  2. The distal-triangular flap was found to be as safe and reliable offering advantages such as convenient operative field exposure and low requirements for the patient’s mouth opening.
  3. On the other hand, the lingual-based triangular flap was superior in controlling postoperative pain, swelling, trismus, and reducing complications compared to the buccal-based triangular flap.
  4. This technique involves creating a triangular-shaped flap of skin that can be rotated or transposed to cover a nearby defect or wound.
  5. The triangular flap is designed with one side as the base and the opposite apex as the point of rotation
impaction

Steps to Create a Triangular Flap​

  1. Marking the Flap: The first step in performing a triangular flap procedure is to carefully mark the boundaries of the flap on the skin surrounding the defect. The shape of the flap should be triangular, with one side designated as the base adjacent to the defect.
  2. Incision: Once the flap is marked, an incision is made along the outlined borders of the triangle. Care must be taken to ensure precise cutting to preserve blood supply to the flap.
  3. Dissection: After making the initial incision, dissection is carried out beneath the skin to separate the flap from underlying tissues while maintaining vascular connections for adequate blood flow.
  4. Rotation or Transposition: Depending on the specific requirements of covering the defect, the triangular flap is then either rotated around its base or transposed to cover the wound area effectively.
  5. Suturing: The final step involves suturing the edges of the flap into place, ensuring proper alignment and closure of both the flap and donor site.

Triangular Flap Indications:

  • The triangular flap design is indicated for various oral surgical procedures, including:
  • Surgical removal of root tips
  • Apicectomy procedures
  • This flap design is particularly useful in cases where extended access to the surgical site is needed.

c) Envelope flap​

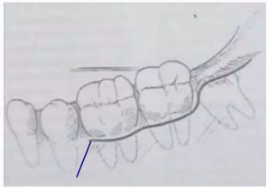
  • In impacted mandibular third molar extraction, the envelope flap technique is a commonly used approach.
  • This technique involves creating an envelope-shaped flap that allows access to the impacted tooth and surrounding bone for extraction.
impaction

Making an Envelope Flap​

  • To create an envelope flap in dento-alveolar surgery, the following steps are typically followed:
  1. Initial Incision: Make a horizontal linear incision parallel to the free gingival margin. This incision should be made carefully to ensure precision and minimal trauma to the tissues.
  2. Elevation of Flap: Elevate the flap from the initial incision site. The flap should be raised gently to avoid damage to the underlying structures and maintain vascularity.
  3. Reflection and Visualization: Once the flap is elevated, it should be reflected adequately to provide clear visualization of the surgical area. This step is crucial for performing the procedure effectively.
  4. Closure Like an Envelope: After completing the surgical procedure, close the envelope flap by positioning and folding the ends of the gingival flaps against the surface of the roots, similar to sealing an envelope. This closure technique helps in securing the flap in place for healing.
  5. Suturing: Use sutures or other appropriate closing techniques to hold the envelope flaps together securely. Proper suturing is essential for ensuring proper healing and minimizing post-operative complications.

The envelope flap technique is particularly useful in cases where there is limited access or visibility due to the position of the impacted tooth.

By creating an envelope flap, the surgeon can effectively visualize the tooth and surrounding structures, making it easier to remove the impacted third molar.

The flap design allows for better retraction and exposure of the surgical site, facilitating a smoother extraction process.

Envelope Flap Indications​

The envelope flap is commonly indicated for various dentoalveolar surgeries, including but not limited to:
  • Simple Tooth Extractions: The envelope flap can be used for straightforward tooth extractions where minimal access and visibility are required.
  • Biopsy Procedures: This flap design is suitable for obtaining tissue samples for biopsy purposes due to its simplicity and ease of manipulation.
  • Alveoloplasty: In cases where reshaping or smoothing of the alveolar bone is needed, the envelope flap can provide adequate exposure for such procedures.
  • Frenectomy: For the removal of abnormal frenum attachments, the envelope flap can be utilized to access and excise the tissue effectively.
  • Crown Lengthening: When there is a need to expose more tooth structure for restorative purposes, the envelope flap can aid in accessing and reshaping the gingival tissues.
  • Gingivectomy: This flap design is suitable for simple gingival recontouring procedures where minimal tissue removal is required.
  • Exposure of Impacted Teeth: The envelope flap can be used to uncover impacted teeth with minimal trauma to the surrounding tissues.
  • Repair of Mucosal Defects: In cases of small mucosal defects or fistulas, the envelope flap can facilitate repair by providing easy access to the affected area.

d) Bayonet flap​

  • The Bayonet flap has shown superiority over the Envelope flap in reducing postoperative pain and wound dehiscence.
  • It may lead to better postoperative outcomes, reduced pain, and lower risk of complications during impacted mandibular third molar extractions.
impaction
  • The bayonet flap is made by following these steps:
  1. Initial Incision: The incision starts on the ascending ramus, following the center of the M3 shelf to the distobuccal surface of the second molar.
  2. Sulcular Incision: The incision then extends as a sulcular incision up to the midpoint of the buccal sulcus of the second molar.
  3. Vestibular Extension: After reaching the midpoint of the buccal sulcus, an oblique vestibular extension is made.
  4. Flap Reflection: Once the incisions are made, the flap is reflected to expose the surgical site for further procedures such as ostectomy and tooth sectioning if necessary.
  5. Flap Approximation: After completing the necessary surgical steps, the flap is approximated and sutured using appropriate materials.
Impacted Wisdom Tooth: How to Prevent Complications (2/5)

Impacted Wisdom Tooth: How to Prevent Complications (2/5)

Explore the Orthodontic theory of impaction, where jaw development and movement play a crucial role. how dental arches can lead to impaction.

Impacted Wisdom Tooth: How to Prevent Complications (4/5)

Impacted Wisdom Tooth: How to Prevent Complications (4/5)

Discover the various techniques of bone removal for impacted teeth on our website. find out the best methods for successful tooth extraction.

0
0
Subscribe
Notify of
guest
0 Comments
Oldest
Newest Most Voted
Inline Feedbacks
View all comments